Role Based Access (RBA) allows you to create roles that reflect the way people work within your organisation.
For example, you could create roles for Support Workers, Key Workers, Agency Workers, Practice Leaders, Registered Managers or Senior Managers, and give each role the appropriate level of access.
Creating a new role
Go to the Portal Admin area.
Select Manage User Roles from the navigation at the top of Portal Admin.
Select Manage Roles.
Click Add Role.
Give your new role a name. Don't worry if you need to change this later – role names can be edited.
Click Create. Your new role will now appear on the screen.
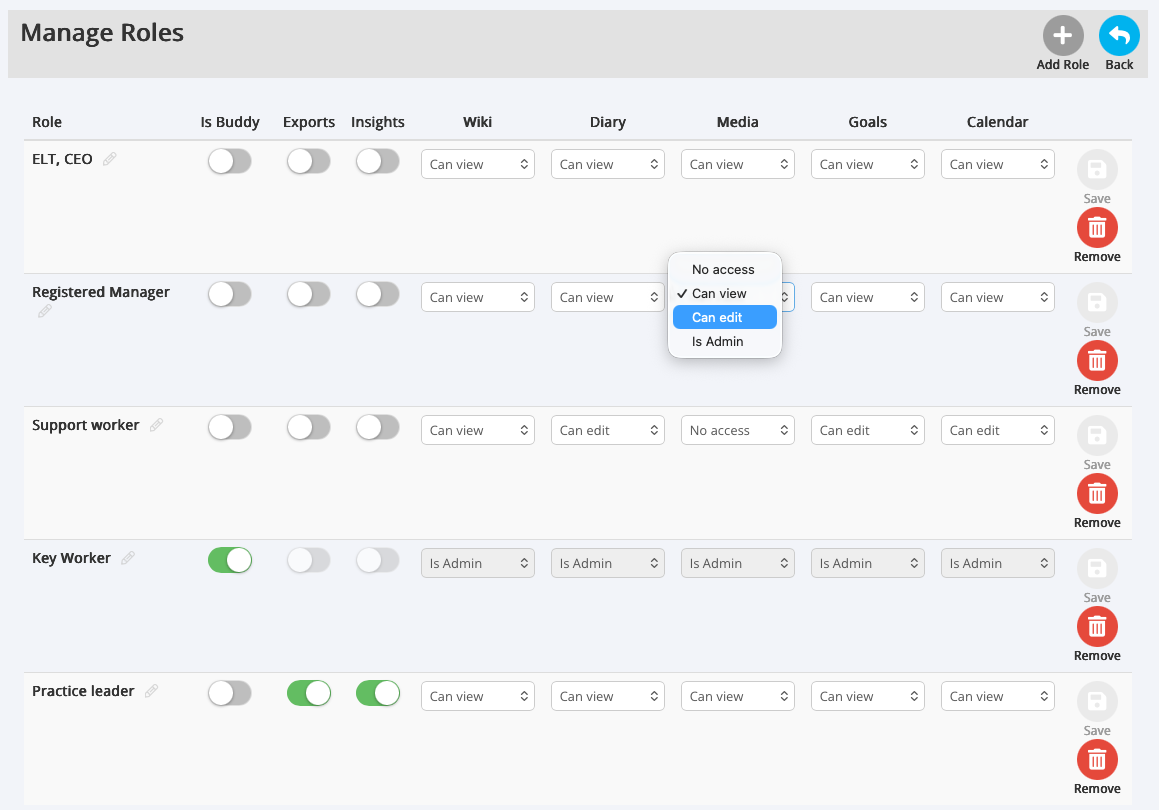
Choose the permissions for the role
For each area of the Supported User's Stuff — such as Wiki, Diary, Goals, Media and Calendar — you can choose the level of access that this role should have.
No Access — The RBA user cannot access that area of the Supported User's Stuff.
Can View — The RBA user can view the content but cannot make changes. Items they have access to will also appear in the relevant areas of their own My Stuff dashboard — for example, a Wiki may appear under Wikis Shared With Me.
Can Edit — The RBA user can view the content and contribute or make edits. However, they can only edit or delete their own contributions, not content added by other users.
Is Admin — The RBA user has full administrative access to that area of the Supported User's Stuff.
For example, someone with Is Admin permission for a Wiki can:
- Edit or delete content throughout the Wiki, including content created by other users.
- Rename the Wiki and change its settings.
- Use Manage Access to manage access to the Wiki.
- Send invitations for other people to view the Wiki or join its Circle, including people outside the RBA system.
- Delete the entire Wiki.
Important: Give each role only the level of access it needs. Is Admin provides significantly more control than Can Edit, so it should normally be used for roles where that additional responsibility is required.
Depending on the role, you can also provide access to Insights for the Supported Users they support, as well as relevant Reports.
Click Save.
That's it! Your role is ready to use. Now go ahead and create the other roles to suit all the different roles in your organisation that will need access to Multi Me. You can create up to 10 roles in total
You can now assign people to this role through RBA Tables.
Editing a role later
You can return to Manage Roles at any time to change a role's permissions.
Make your changes and click Save. The updated permissions will then apply to users assigned that role through your RBA Tables.
What does 'Is Buddy Role' mean?
When creating or editing a role, you can also choose Is Buddy Role.
Selecting this means that people assigned to this role will also become Buddies of the Supported Users they have access to through the RBA Table.
Buddy access provides a higher level of control than standard RBA permissions. A Buddy has Admin access to the Supported User's Stuff, together with additional Buddy-specific features such as Manage User, which can allow them to approve or veto certain activities and sharing on behalf of the Supported User.
Only select Is Buddy Role when the people assigned to that role should have this additional level of responsibility.
For more information, see Understanding the Buddy Role.
Tip: Create roles around people's responsibilities rather than individual staff members. For example, create a Key Worker role rather than a role called John Smith. This makes permissions much easier to manage when staff join, leave or change responsibilities.
Was this article helpful?
That’s Great!
Thank you for your feedback
Sorry! We couldn't be helpful
Thank you for your feedback
Feedback sent
We appreciate your effort and will try to fix the article